
To make an AI Christmas photo of your family, edit a photo you already have rather than generating a new one: upload it, describe the Christmas scene in words, and tell the AI to keep everyone's faces the same. Below are the prompts and the exact results we got on a Free account, in a browser; the SmileToAI app for iOS and Android has the same tool. In SmileToAI's AI Image Generator that takes four steps: upload your photo under References and choose Add reference to gallery, open it with the pencil (Edit image) icon, pick the Prompt Edit tab and write what should change, then choose how many variations you want and select the run button (it reads Run 2 Edits when two are chosen). Every result is saved as a new version, so the original is never overwritten.
We ran it for this guide on a family photo with the prompt "Turn this into a cozy Christmas photo: put a decorated Christmas tree with warm string lights behind the sofa, show snow falling outside the window, and dress all three of them in matching red knit Christmas sweaters. Keep their faces, expressions and poses exactly the same." Two variations came back in under a minute, both with the tree, the snow and the sweaters added. One kept all three faces almost exactly; the other redrew them slightly. A second, masked edit then put a Santa hat on the father alone and left the rest of the photo as it was. We then ran the same steps on a five-person family photo with grandparents, checked every face one by one, and put Santa hats on the whole group with a single mask.
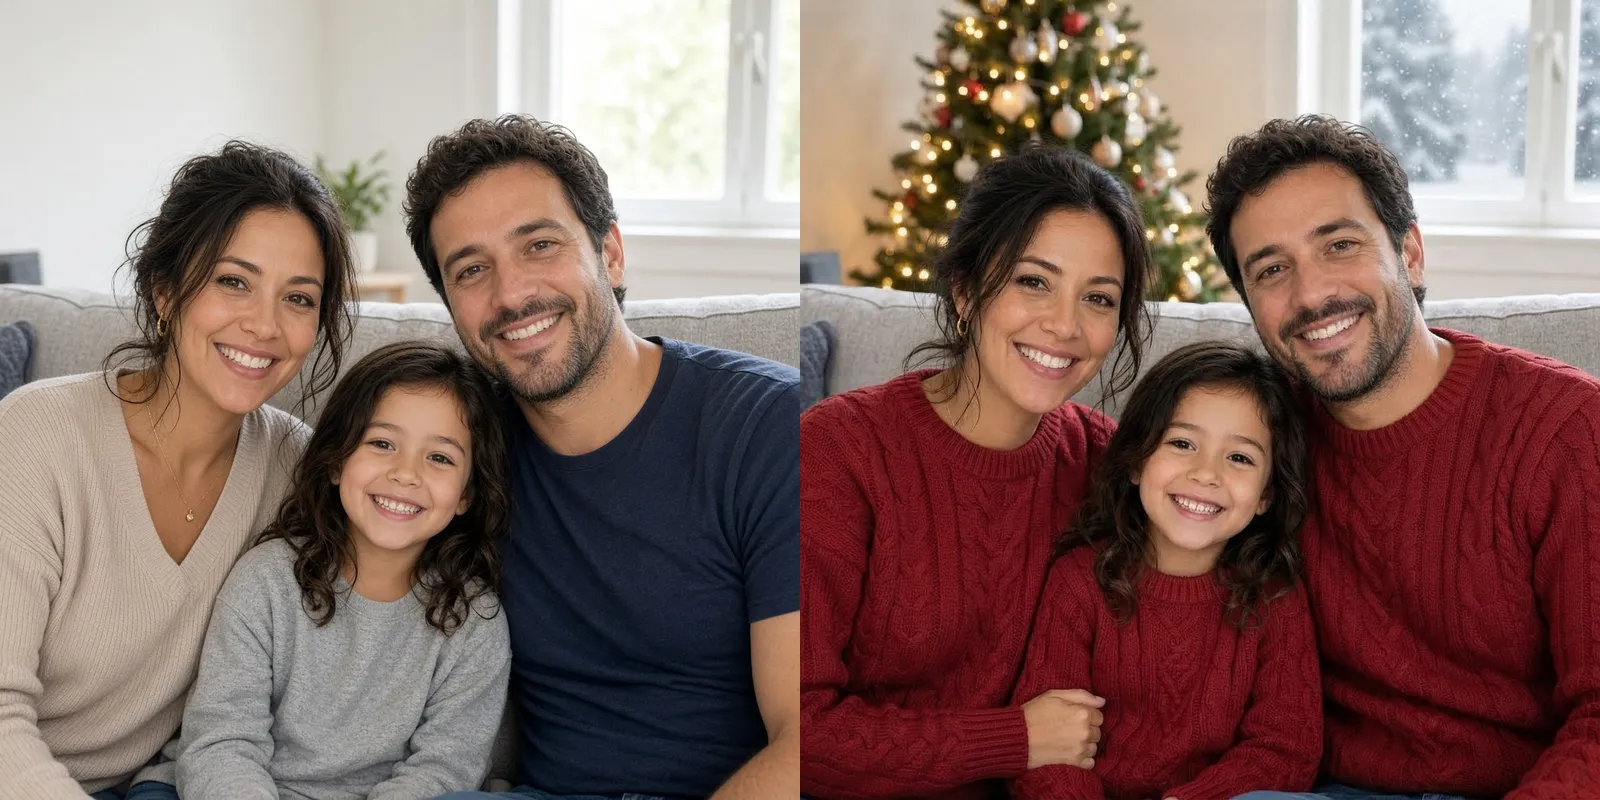
Left, the test photo; right, one of the two Christmas variations from the prompt above. We generated the test photo in SmileToAI so that no real person's face appears in this guide; with your own photo, every step is the same.
What it costs: edits use Sparks, SmileToAI's credits, so you need a SmileToAI account; the Free plan works. It includes 5,000 Sparks a month. Our Christmas-scene run (two variations) used 365 Sparks and the Santa-hat run (two variations) used 340, so the whole test came to 705 Sparks, about a seventh of a month's Free allowance.
The rest of this guide walks through each step with the real screens and results, and covers the two things people get wrong most: faces that drift and changes that spread further than you wanted.
What you'll need
- A photo in PNG, JPG, GIF or WebP format, up to 20 MB. A clear, well-lit photo where faces are not tiny gives the best results.
- A SmileToAI account. Edits use Sparks, and the Free plan includes 5,000 Sparks a month.
- A browser, or the SmileToAI app for iOS and Android, which has the same Prompt Edit tool.
Step 1: Upload your photo and add it to the gallery
- Open the AI Image Generator.
- Open the generation settings (the gear button next to the panel title), find References and select the plus button (Pick from library), then Upload images and pick your photo. The composer's plus menu also has an upload option.
- Close the library. Your photo now sits in the References list. Select Add reference to gallery next to it so it becomes a gallery image you can edit.
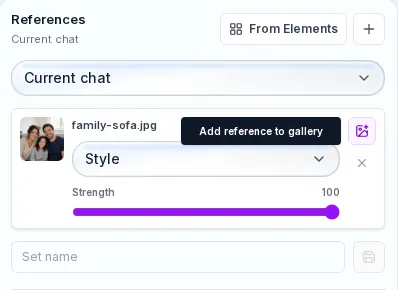
The uploaded photo in References. The button on the right, Add reference to gallery, puts it in the gallery for editing.
Step 2: Open the editor and choose Prompt Edit
Hover over the photo in the gallery and select Edit image (the pencil icon). The editor opens with the photo on the left, the Version Map on the right and the editing tools along the bottom. Choose the Prompt Edit tab.
Prompt Edit changes an image from a description in plain words. It has two optional helpers: Improve prompt rewrites your instruction with more detail, and Suggest edits proposes edit ideas for the selected image. The model picker at the top of the editing tools can pin a specific model; leaving it on Auto lets SmileToAI pick one that can run the edit, and in our test Auto used different models for the two variations of the same run.
Step 3: Describe the Christmas scene
Write the change in the Edit prompt box. A prompt that works has three parts:
- What to add or change in the scene: a tree, lights, snow, a fireplace, garlands.
- What to change on the people, if anything: matching sweaters, a Santa hat, reindeer antlers.
- What must not change: "Keep their faces, expressions and poses exactly the same." This line matters more than any other, because without it the model is free to redraw people too.
Ending with what must not change works for edits that have nothing to do with Christmas too. Our AI photo editing prompts guide tests it on light, weather, style, background and removal edits, with the before and after for each.
Then pick how many variations to run with the arrow next to the run button (1, 2, 4, 8 or 16) and select the run button, which reads Run 2 Edits with two chosen. More variations cost more Sparks but give you a choice, which helps with a photo you care about.
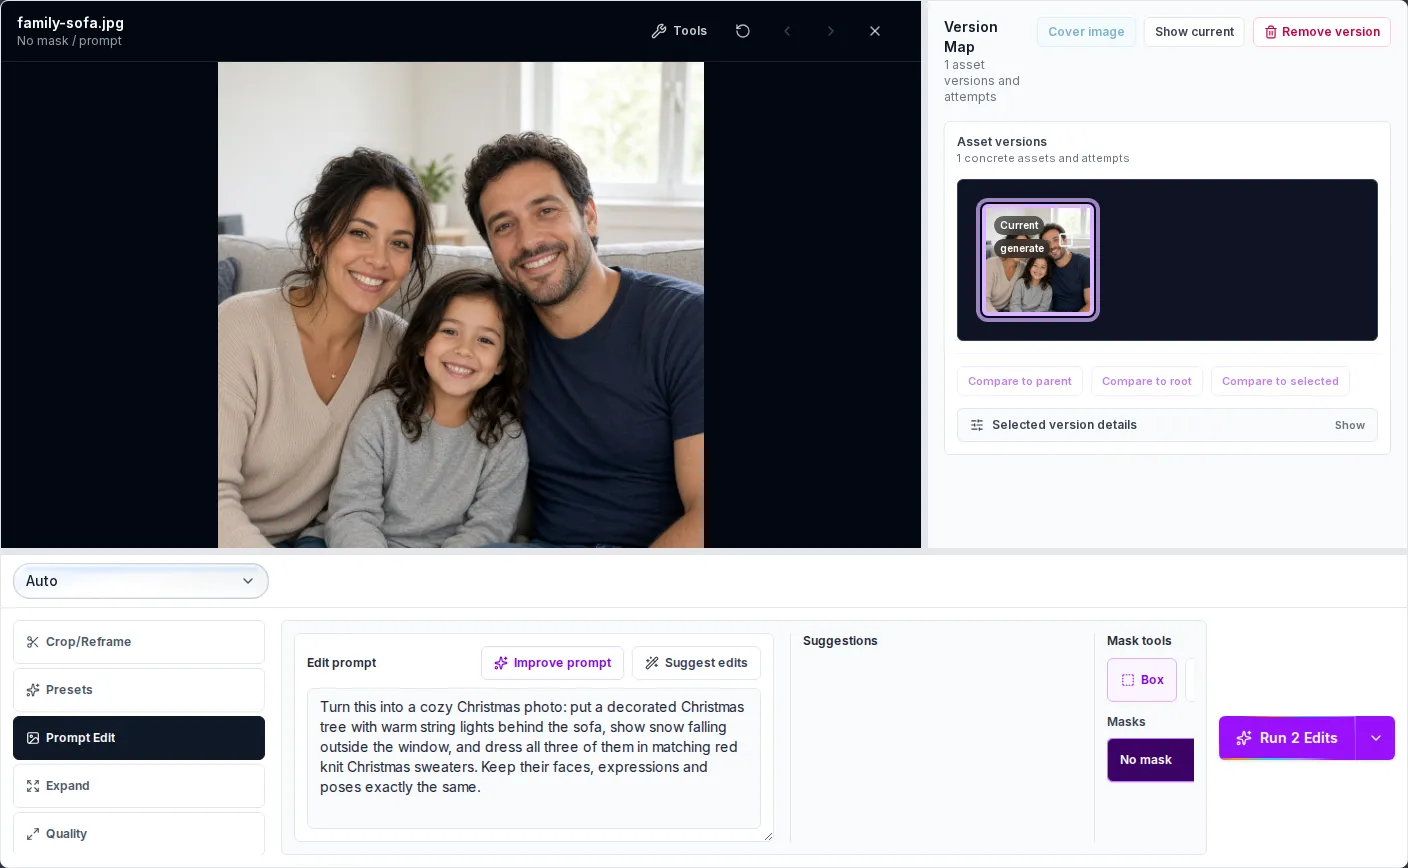
Prompt Edit with the full Christmas prompt and two variations selected. No mask, so the whole photo can change.
Step 4: Compare the variations
Each variation is added to the Version Map as a new version linked to the original. Our two came back with the same idea done two ways:
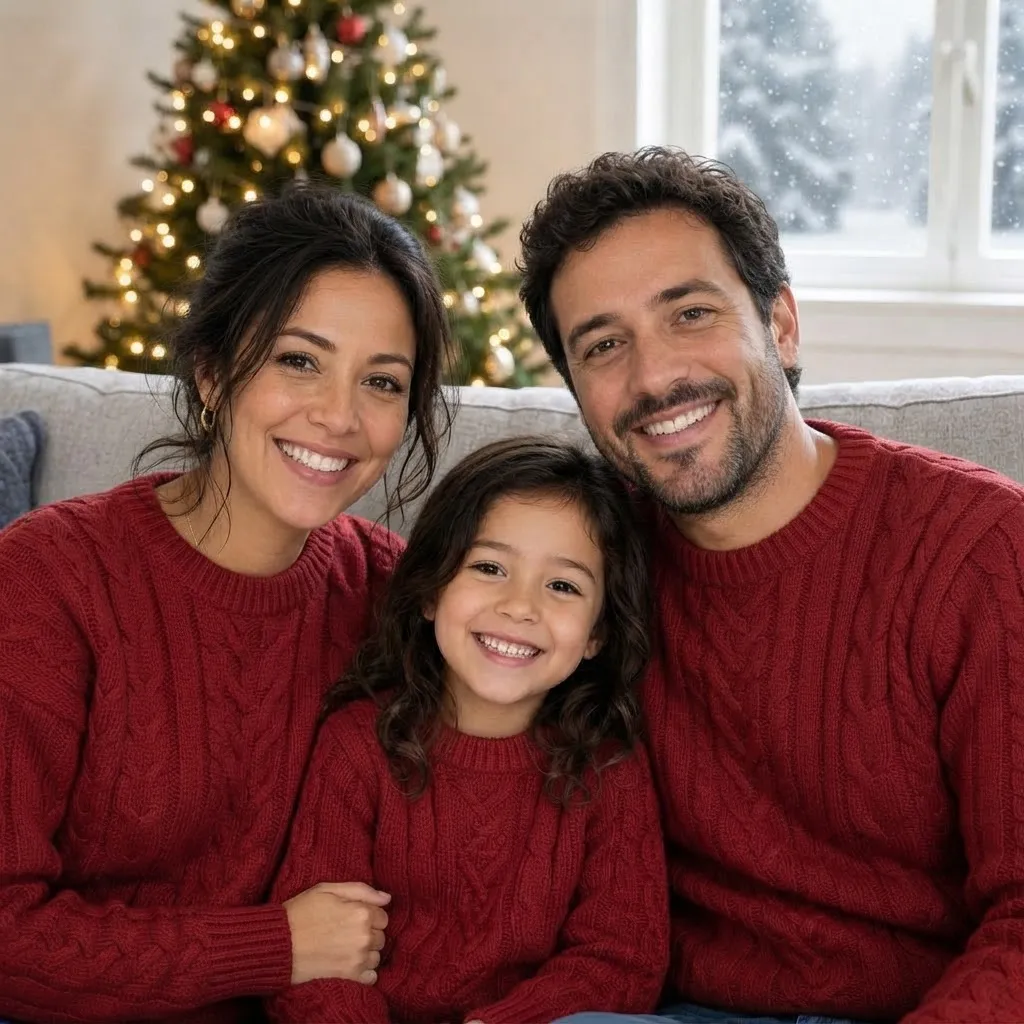
Variation 1: plain red cable-knit sweaters, a lit tree on the left and snow on the window.
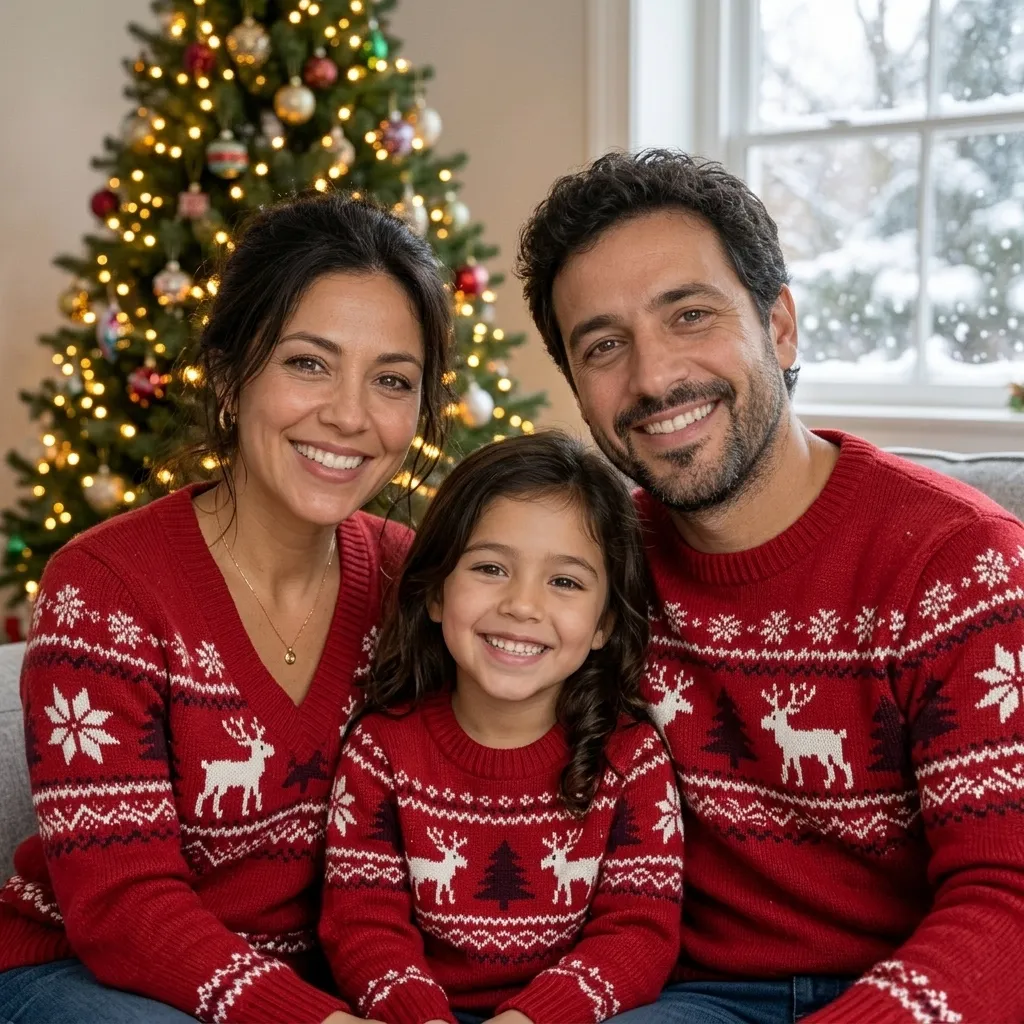
Variation 2: the model read "Christmas sweaters" as patterned reindeer sweaters and decorated the tree more heavily.
Both kept the way the family sits together and their smiles, but they differ on faces. Variation 1 kept all three faces almost exactly. Variation 2 kept the family recognizable but redrew the faces slightly, most visibly the mother's. That is why it pays to run more than one variation and pick the one where everyone still looks like themselves. Variation 1 is not pixel-perfect elsewhere either: variation 1 dropped the mother's necklace and added her hand resting on her daughter's arm, which was not in the original. That is typical of a whole-photo edit. The model rebuilds the image around your instruction, so small details can change even when the people look right. If one detail matters, say so in the prompt, or use a mask (next step) so that part is not touched at all.
Use Compare to parent in the Version Map to slide between a result and the photo it came from.
Step 5: Add a Santa hat with a mask
A mask limits an edit to one area. Everything outside it is left alone, which is the safest way to add a single prop to a photo you like.
- Select the version you want to build on in the Version Map. We used variation 1.
- In Prompt Edit, under Mask tools, choose Box (or Brush for an irregular shape) and drag over the area to change. For a hat, cover the top of the head and some space above it, so the hat has room.
- Describe only that change: "Put a classic red Santa hat with a white fur trim and pom-pom on the man's head, sitting naturally on his hair."
- Run the edit. Leave some room around the head when you draw the box: in our run the hat's brim and one variation's pom-pom reached slightly past the box's edges.
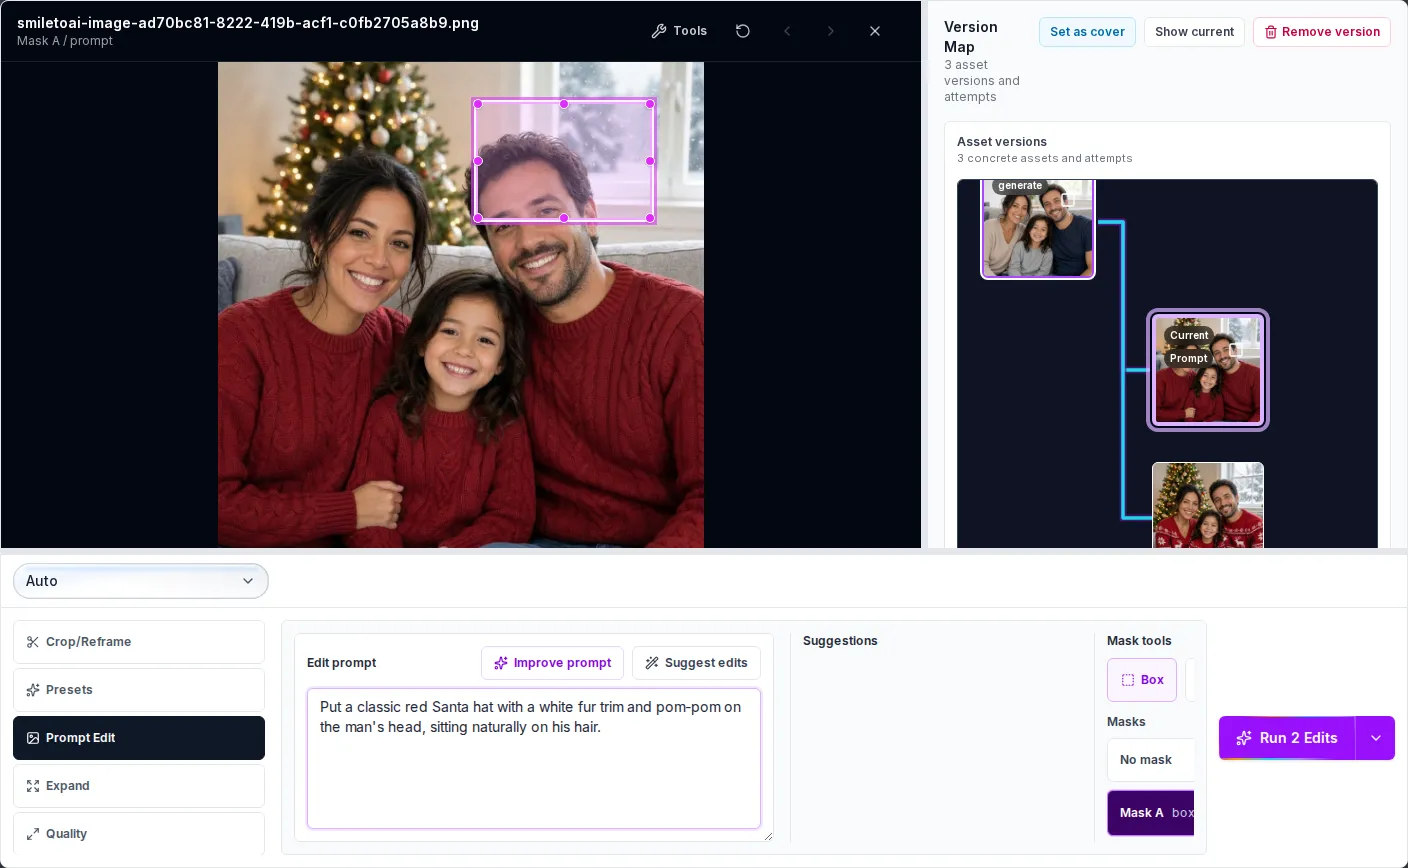
A Box mask (Mask A) over the father's head. Only this area is edited.
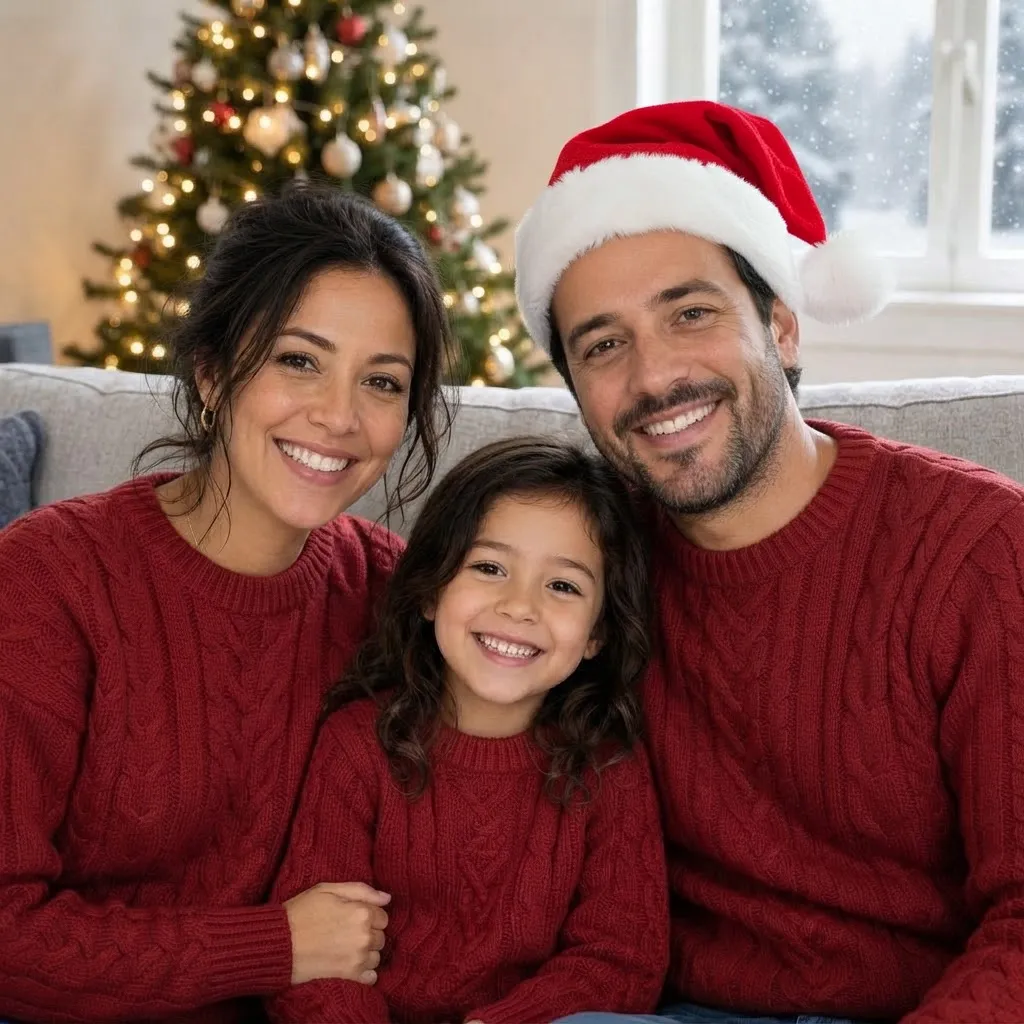
The masked edit. The hat sits on the father's head; the mother, the daughter, the sweaters and the tree stay as they were in variation 1.
The masked run took about a minute and used 340 Sparks for two variations. Both put the hat on the father only; one drew it a little larger, with the pom-pom hanging over his ear. To give a whole group hats, one wide Box over every head can do it in one run; the five-person test below shows how that went.
Step 6: Pick the final version and download it
Every edit stays in the Version Map, so nothing is lost if a later edit goes wrong. Select the version you want to keep and choose Set as cover: that makes it the one the gallery shows. Close the editor, hover over the image and select Download.
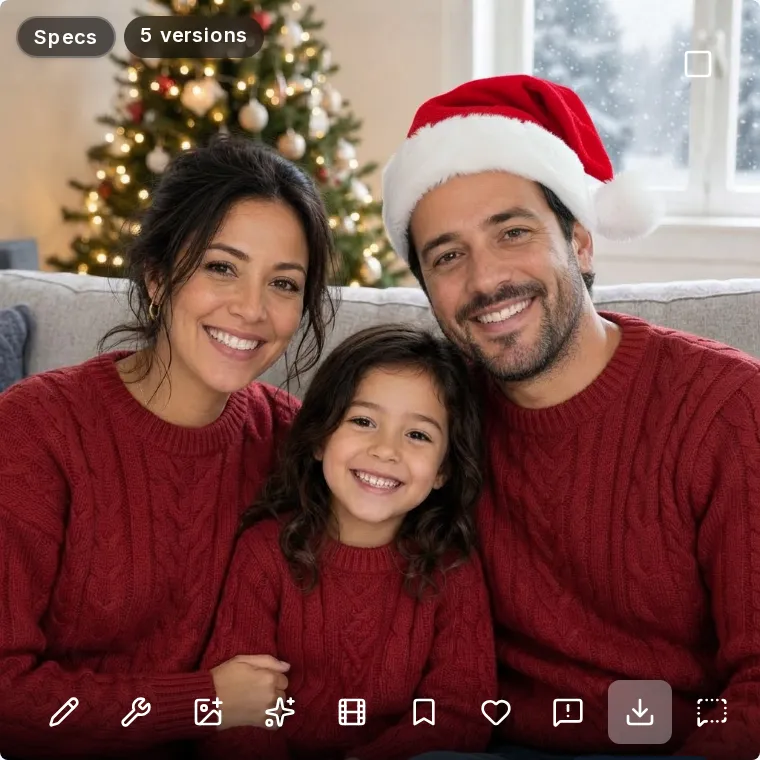
The finished photo in the gallery. The badge shows the five versions behind it: the upload, two Christmas scenes and two Santa-hat edits.
From there the photo is yours to use: post it, set it as a profile picture, or drop it into a card design or a print order. SmileToAI does the photo itself; laying out or sending a printed card happens in whatever tool you already use.
An AI family Christmas photo with grandparents and kids
The more people in a photo, the more faces the model can drift on. So we ran the same steps again on a bigger group: five people from three generations, grandparents, parents and a boy of about eight, sitting on one sofa. Like the first test photo, it was generated in SmileToAI.
The prompt was "Turn this into a cozy Christmas family photo: put a tall decorated Christmas tree with warm string lights by the window, hang a garland with lights along the bookshelf, and dress all five of them in matching red knit Christmas sweaters. Keep every face, expression and pose exactly the same." Two variations came back in about half a minute and used 370 Sparks.
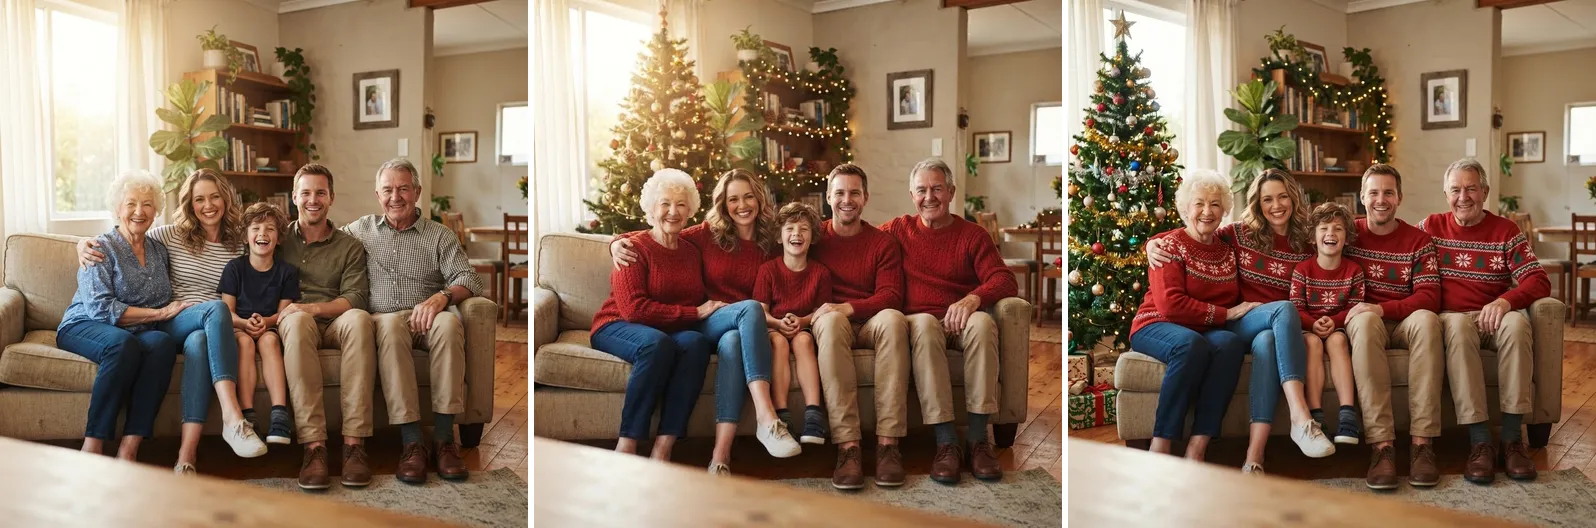
Left, the test photo; middle, variation 1 with plain red sweaters; right, variation 2 with patterned sweaters. Both added the tree, the lit garland and the sweaters.
Check every face, one at a time
A group photo can look right at a glance while one face is off, so check each person against the original before you keep a version. Compare to parent in the Version Map slides between a result and the photo it came from; zoom in and look at one face at a time. Here are the five faces from the original and both variations:
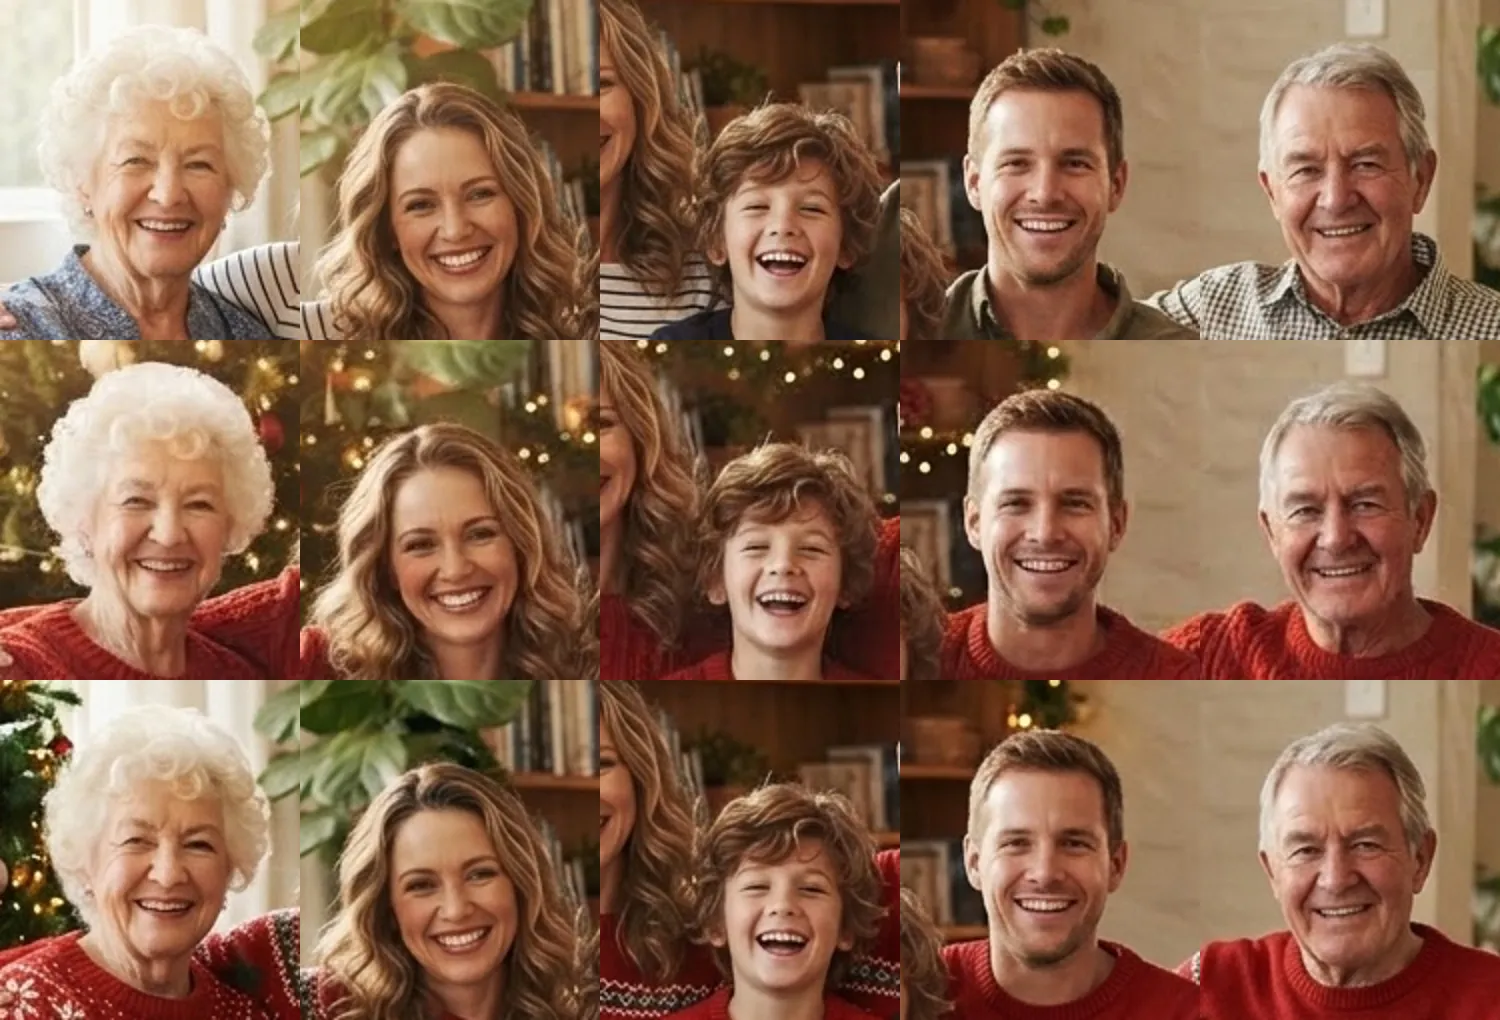
Top row, the original; middle, variation 1; bottom, variation 2. Left to right: grandmother, mother, boy, father, grandfather.
- Variation 2 kept all five faces very close to the original. It also added wrapped presents under the tree, which the prompt did not ask for.
- Variation 1 redrew the boy most visibly: his eyes are almost closed where they were open in the original. The other four stayed recognizable.
One variation in two had a face you would notice at a family dinner, which is why two variations is the minimum for a group. Keep the one where everybody still looks like themselves.
Santa hats for the whole group with one mask
An edit uses the one mask selected in the Masks list, so five separate boxes do not give five people a hat in one run. Draw one Box that covers every head instead. Heads rarely line up: in our photo the boy sits lower than everyone else, so a box low enough to reach his hair also covers the adults' faces down to their mouths. We drew it that way on variation 2 and repeated the face instruction in the prompt: "Put a classic red Santa hat with white fur trim and a pom-pom on each of the five people's heads, sitting naturally on their hair. Keep their faces exactly the same."
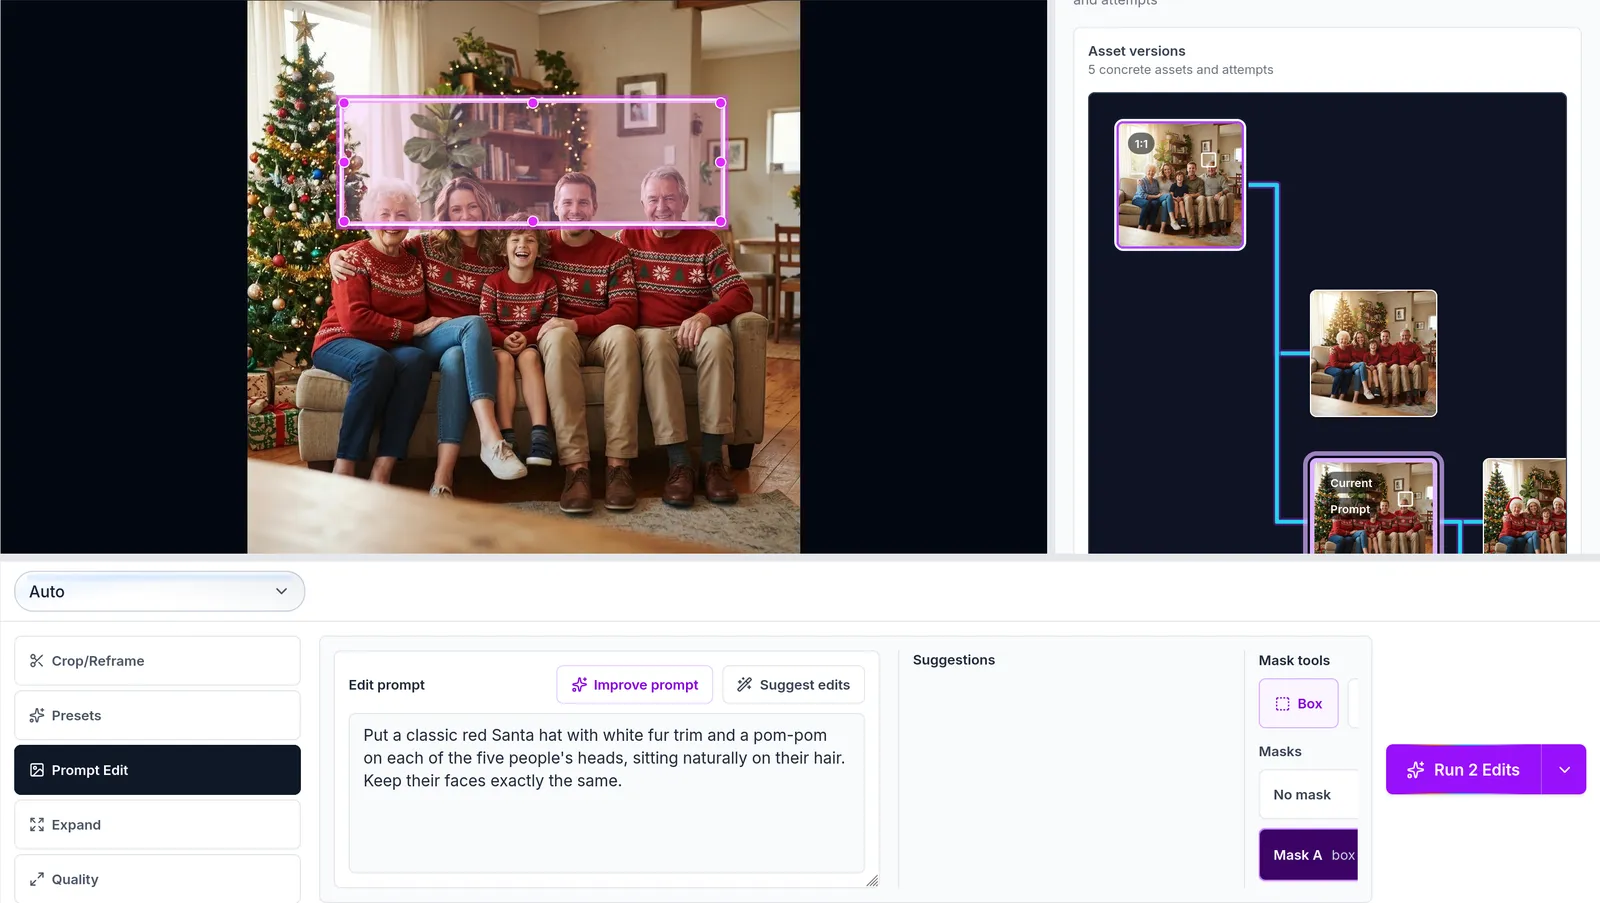
One Box mask (Mask A) across the row of heads, the hat prompt and two variations selected.
Two variations took about half a minute and used 340 Sparks:
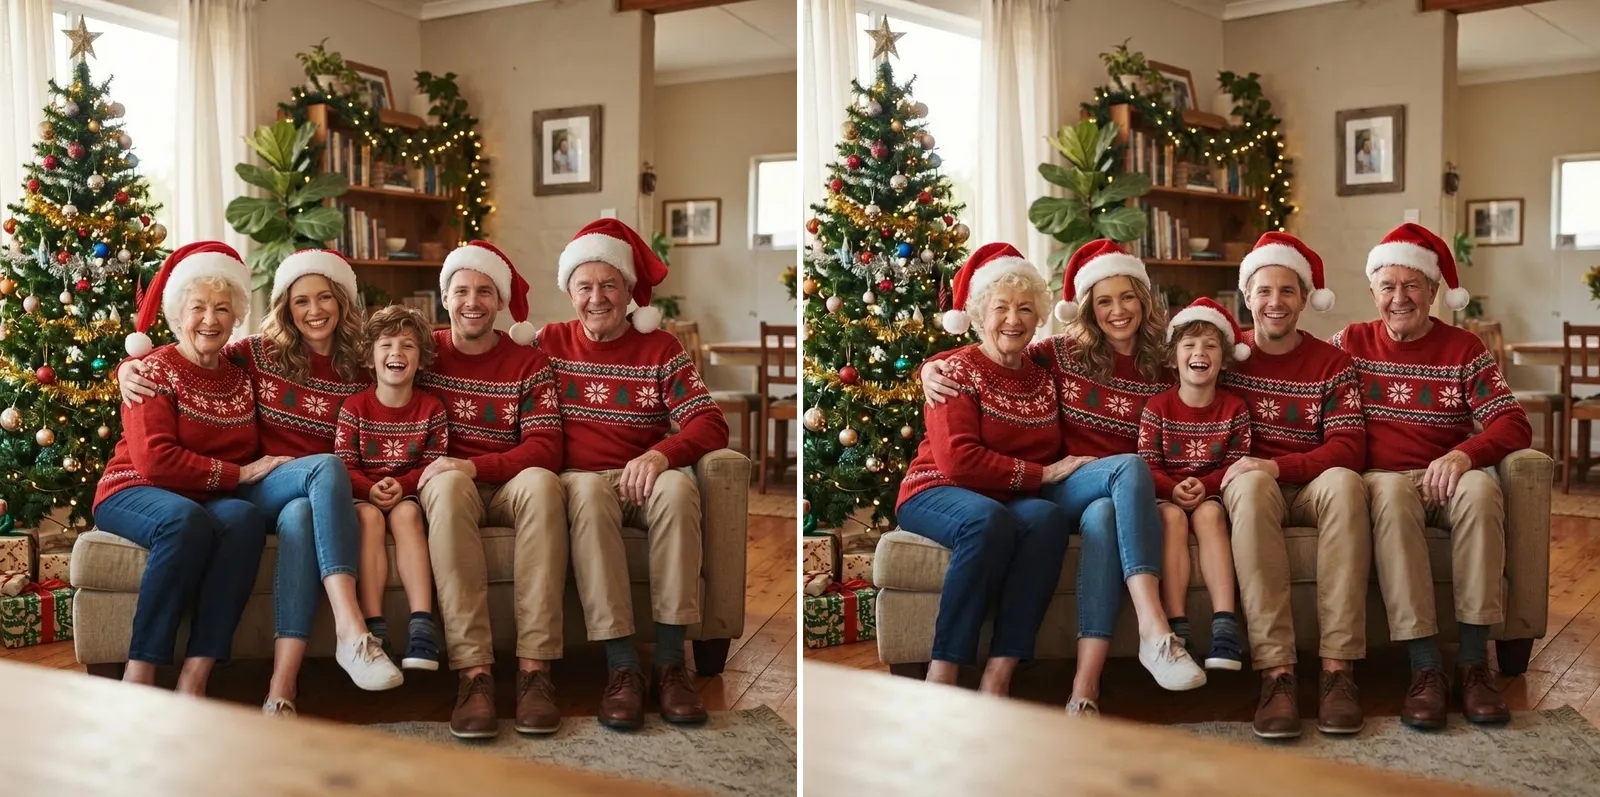
Left, variation 1: hats on four people, none on the boy. Right, variation 2: a hat on all five.
Variation 1 missed the boy, whose head was the lowest in the box. Variation 2 gave everyone a hat. In both, the faces stayed as they were and the rest of the photo did not visibly change, although some brims and pom-poms reached a little past the box, as in the first test. If one person is missed, keep the better version and run one more masked edit with a small box over just that head.
The whole second test used 1,515 Sparks, but 805 of those went on the four images we generated to pick a test photo. Starting from your own photo, the Christmas scene and the group hats came to 710 Sparks, about a seventh of the Free plan's 5,000 a month.
Prompt ideas for other Christmas photos
Keep the last sentence ("Keep their faces, expressions and poses exactly the same") on every whole-photo prompt.
- Snowy outdoor scene: "Move them outdoors into a snowy pine forest at dusk with soft falling snow and warm light from a cabin behind them."
- Fireplace: "Replace the background with a cozy living room with a lit fireplace, stockings on the mantel and a garland with warm lights."
- Pet photo: "Add a small red Christmas scarf around the dog's neck and a few wrapped presents on the floor beside it." Use a mask on the dog's neck if only the scarf should appear.
- Just the window: mask the window and prompt "Show heavy snow falling outside with snow-covered trees."
Common problems and fixes
A face changed. Add or strengthen the "keep their faces exactly the same" line, run more variations and keep the best one, or switch to masked edits that never touch the faces.
The change spread further than you wanted. A whole-photo prompt lets the model redraw anything. Draw a mask over just the area to change.
Someone in a group photo was missed or changed. Zoom in on every face before you keep a version. Run more variations, or fix one person with a small masked edit over just their head.
The prop looks pasted on. Give the mask a little room around the object and describe how it should sit ("sitting naturally on his hair", "in the same warm light as the room").
A model can't run a masked edit. If you pinned a model that can't apply masked edits, the editor shows a warning when you run it and blocks the run until you pick another model or go back to Auto.
What Prompt Edit doesn't do
- Lay out a printed card or send it. Download the photo and use your card or print service for that.
- Edit video. To animate a photo, use the separate AI Video Creator.
- Guarantee that every pixel outside a mask-free edit stays the same. Use a mask when that matters.
The short version
Upload your photo, open it in the editor, choose Prompt Edit, describe the Christmas scene and end the prompt with "keep their faces, expressions and poses exactly the same". Run two or more variations and keep the best. For a single prop like a Santa hat, draw a Box or Brush mask so nothing else changes. In our test the full scene cost 365 Sparks for two variations and the masked hat 340, on a Free plan that includes 5,000 Sparks a month.
FAQ
Can AI turn my own photo into a Christmas photo?
Yes. In SmileToAI's AI Image Generator, upload the photo, open it in the image editor, choose Prompt Edit and describe the Christmas scene you want, for example a decorated tree, snow outside the window and matching sweaters. Each result is saved as a new version, so the original stays untouched.
Will the AI change the faces in my photo?
Say in the prompt that faces, expressions and poses must stay the same, and run more than one variation. In our test one variation kept all three faces almost exactly, while the other kept the family recognizable but redrew the faces slightly, most visibly the mother's. Small details elsewhere, such as a necklace and a hand, can change too. To change only one area, draw a Box or Brush mask over it so the rest of the photo is left alone.
How do I add just a Santa hat without changing the rest of the photo?
Draw a Box mask over the top of the person's head in Prompt Edit, leaving some room around it, then describe the hat. The edit is limited to the masked area. In our test the hat appeared on the father only and the rest of the photo stayed the same.
How do I make an AI Christmas photo of my whole family?
Upload the family photo, open it in the editor's Prompt Edit tab, describe the tree, lights and sweaters, and end the prompt with "Keep every face, expression and pose exactly the same." Run at least two variations, then zoom in on each person and compare with the original before you keep one. In our five-person test, one variation kept all five faces very close to the original, while the other visibly redrew the boy's face.
Can I add Santa hats to everyone in a group photo at once?
Yes. An edit uses the one mask selected in the Masks list, so draw a single Box mask that covers every head and ask for a hat on each person. In our five-person test with two variations, one put a hat on all five people and the other missed the boy. If someone is missed, run one more masked edit with a small box over just that head.
Is it free?
Edits use Sparks, SmileToAI's credits. The Free plan includes 5,000 Sparks a month. In our test on a Free account, two variations of the full Christmas scene used 365 Sparks and two variations of the masked Santa-hat edit used 340.
Can I do this on my phone?
Yes. The SmileToAI app for iOS and Android has the same Prompt Edit tool with Box and Brush masks and the same variation counts.