
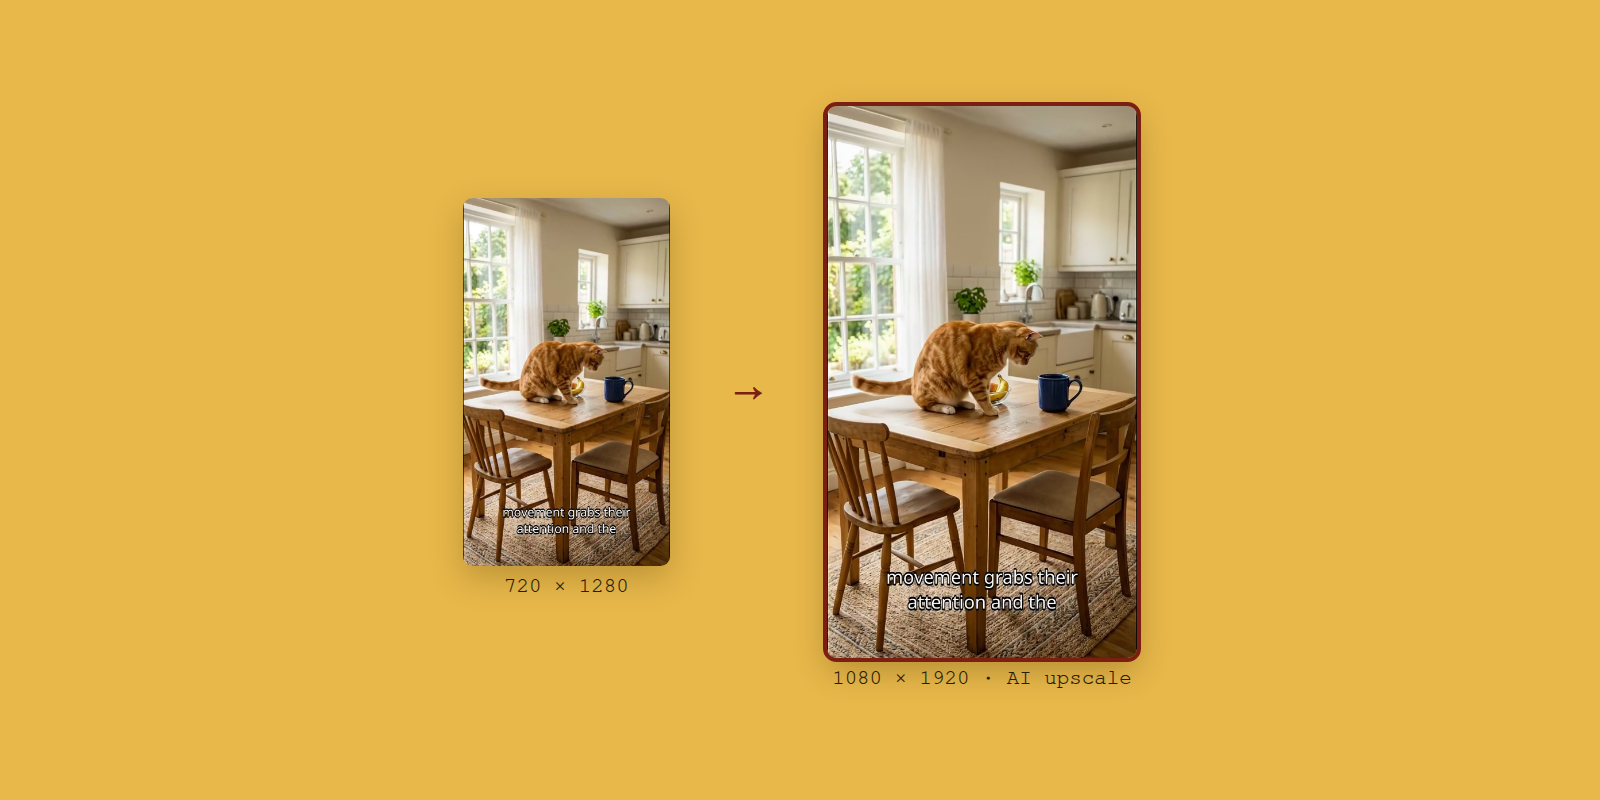
To upscale a video, you run it through an AI video upscaler, which rebuilds each frame at a higher resolution instead of just stretching the pixels. In SmileToAI it takes four steps:
- Upload the clip to Assets and open it.
- Under Tools, choose Upscale video.
- Pick a Target resolution: 1080p (the default) or 4K. Check the Estimated cost.
- Select Confirm and run, then download the new clip when it appears next to the original.
The tool takes MP4, MOV or WebM clips of up to 60 seconds and always returns 30 frames per second. It is on paid plans, the cheapest being Plus at $19 a month with 30,000 Sparks, and it is billed per second with a 6-second minimum. We ran a 6-second, 720×1280 vertical clip to 1080p: it came back at 1080×1920 and 30 fps, 6.0 seconds long, for 840 Sparks. The same clip at 4K was estimated at 3,360 Sparks, four times the 1080p price. A side-by-side crop of the same frame, before and after, is in step 3.
Here is the 1080p result, unedited apart from converting it to H.264 so it plays in every browser:
The upscaled clip: 1080×1920, 30 fps, 6.0 seconds. The source was 720×1280.
What upscaling does, and what it can't
Resolution is the number of pixels in each frame. A 720p vertical clip is 720 pixels wide and 1,280 tall; 1080p is 1,080 by 1,920; 4K is about four times as many pixels again. Simply enlarging a small video makes it bigger but softer, because the editor has to invent the in-between pixels by averaging. An AI upscaler is trained to guess what fine detail should be there, such as edges, texture, strands of fur or lettering, and draws it in.
That means three things in practice:
- It helps most with clips that are small but clean. Old phone footage, a 720p export or a frame from an AI video generator gains the most.
- It can't recover what was never there. A heavily compressed, blurry or out-of-focus shot gets sharper edges, but the details the model draws are a best guess, not the original scene.
- It can't change the shape of the video. A vertical clip stays vertical. To change the aspect ratio, reframe the video first.
What you'll need
- A clip of 60 seconds or less, as MP4, MOV or WebM. For a longer video, export it in parts.
- A paid SmileToAI plan (Plus, Pro or Team). Upscale video is not on the Free plan.
- Enough Sparks for the run: about 140 Sparks per second at 1080p and 560 per second at 4K, with any clip shorter than 6 seconds billed as 6. The run sheet shows the exact estimate before anything is charged.
Our test clip is SmileToAI's own: the first 6 seconds of a vertical YouTube Short about cats, made in SmileToAI for our home page. It is 720×1280 at 30 fps, with captions burned in.
Step 1: Upload the clip and open it
- In the SmileToAI workspace, open Assets in the sidebar.
- Select Upload and pick your video.
- Select the clip to open the Asset inspector on the right.
The inspector plays the clip and lists the video tools for it under Tools, with a starting price where one applies.
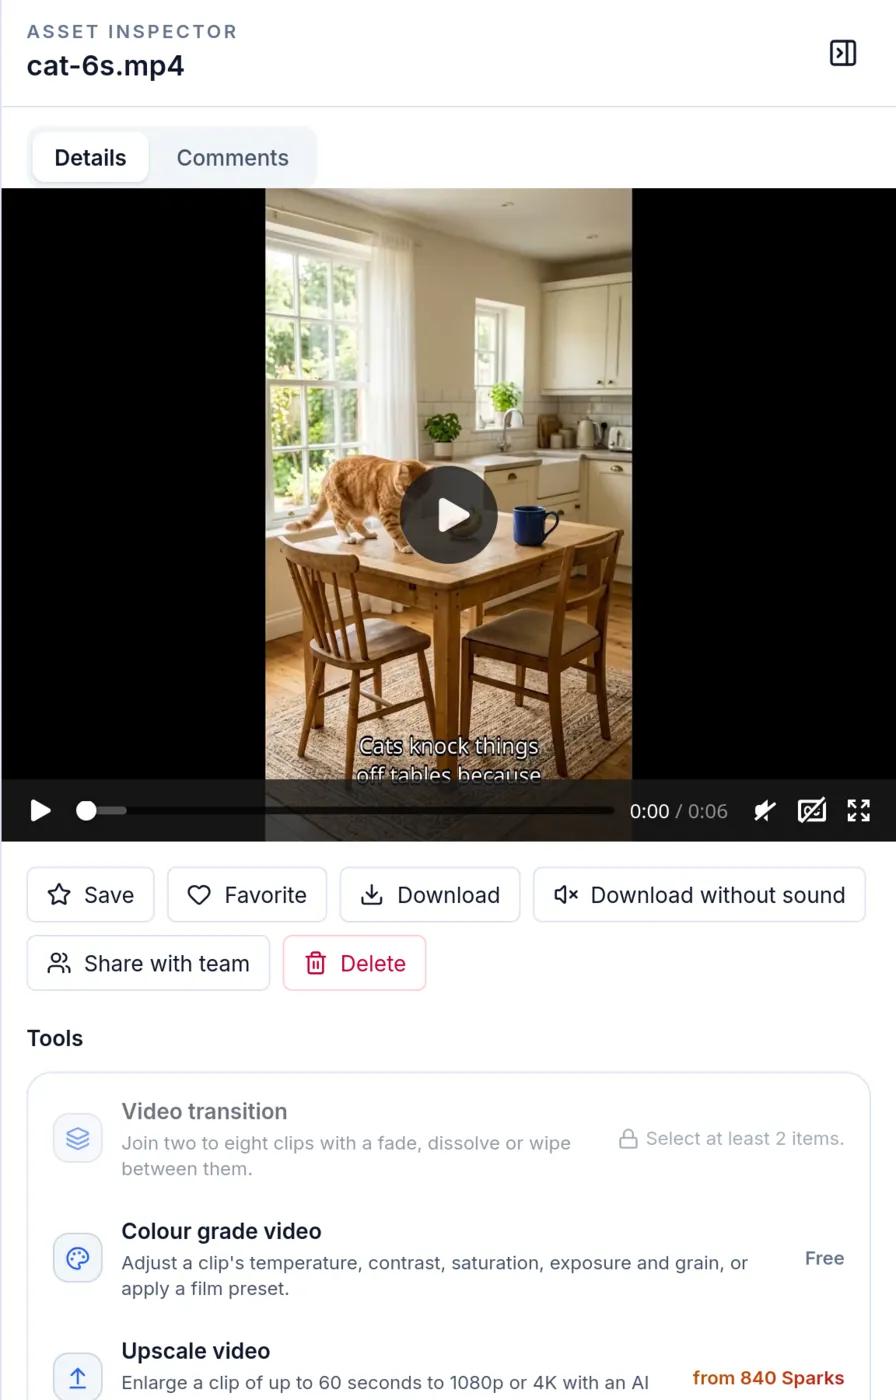
The uploaded clip in the Asset inspector. Upscale video is in the Tools list, from 840 Sparks.
Step 2: Choose Upscale video and a target resolution
- Under Tools, select Upscale video.
- Under Target resolution, keep 1080p or switch to 4K.
- Read the Estimated cost. It is based on your clip's length.
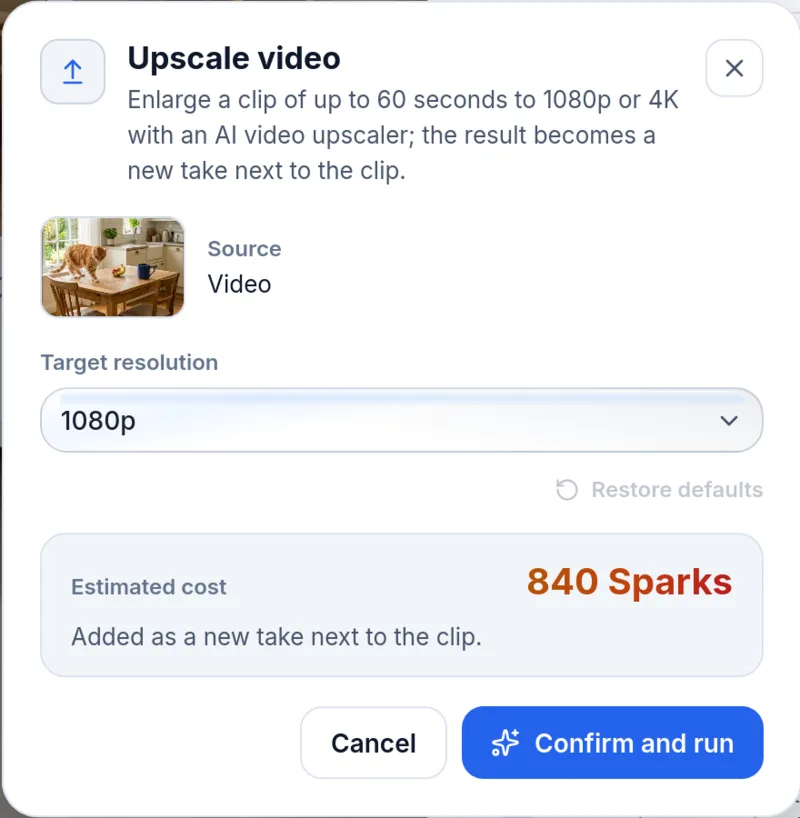
The run sheet at 1080p: 840 Sparks for our 6-second clip.
Switching to 4K quadruples the price for the same clip:
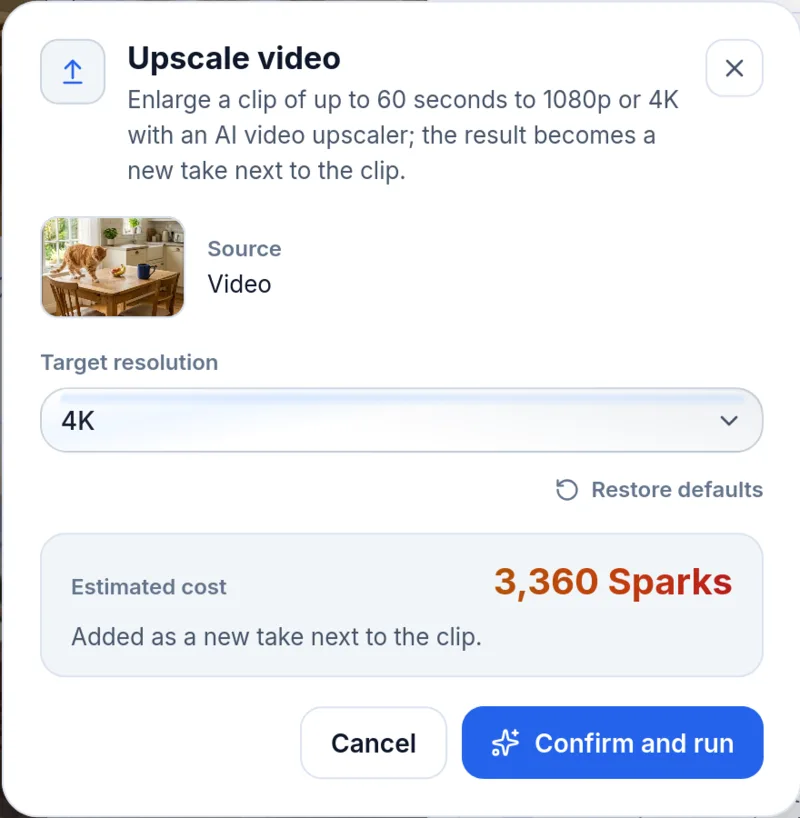
The run sheet at 4K: 3,360 Sparks for the same 6 seconds.
Which should you pick? Choose 1080p for social posts, phones and most websites: it is full HD, and it costs a quarter of 4K. Choose 4K when the clip is going into a 4K edit or onto a large screen, and check that the source is clean enough to be worth it.
Step 3: Run it and find the result
- Select Confirm and run.
- Wait for the run to finish. Our 6-second clip took under a minute.
- The upscaled clip appears in Assets as a new video next to the original. Your original is not changed.
Upscaling a clip on the AI Video Creator canvas
If the clip is already on a canvas in the AI Video Creator, you don't need to go back to Assets. Select the clip, then select Tools in the toolbar under it. The same Upscale video entry is there, with the same run sheet and price, and the result becomes a new take next to the clip on the canvas.
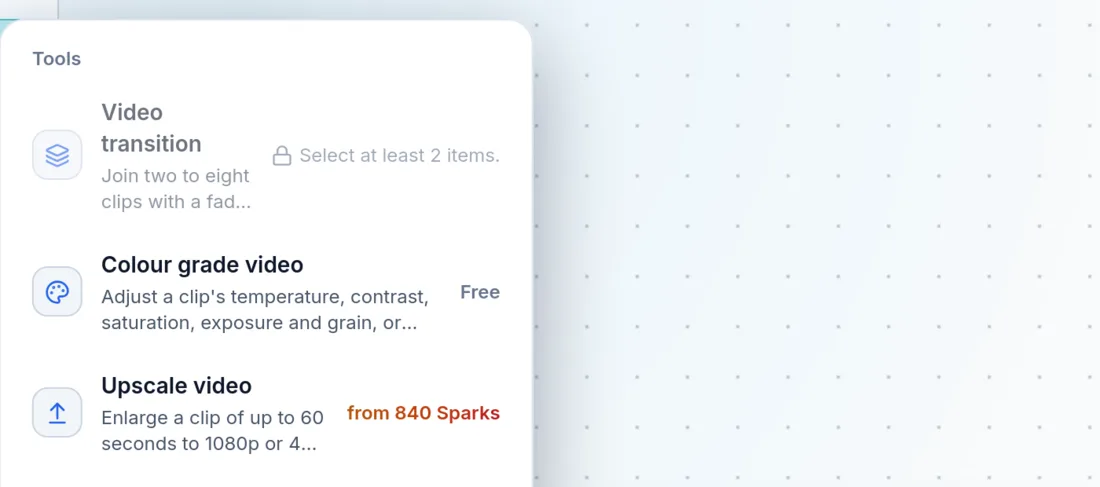
The Tools menu on the canvas, opened from a selected clip.
The canvas's free Export panel also guards against a common mistake. For our 720p clip, its 4K resolution option is unavailable, with a note that a 4K export would only stretch the clip and a link straight to an AI upscale:
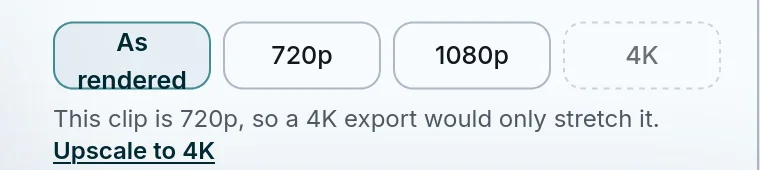
Export won't make 4K from a 720p clip; Upscale to 4K opens the upscaler instead.
To compare quality, here is the same moment from both files, cropped to the same area. The 720p frame on the left is enlarged to the upscaled size the ordinary way, without AI:

Left, the 720p source frame enlarged with standard resampling. Right, the same frame from the AI upscale.
The difference is real but modest: the stripes in the fur are a little crisper on the right, and the soft areas look less smeared. That is what to expect from a source that was already clean 720p. Blurrier, smaller or older footage shows a bigger jump.
Step 4: Download the upscaled video
Select the new clip in Assets and use Download in the inspector. Download without sound gives you a silent copy if you need one.
The file we downloaded was an MP4 using the HEVC (H.265) codec. Most phones and editing apps play it. If a browser or an older editor won't, convert it to H.264 with any video converter; that changes the file's codec, not the picture.
Limits worth knowing
| Limit | What it means |
|---|---|
| 60 seconds per clip | Longer videos need to be split before upscaling |
| 1080p or 4K only | No 1440p or 8K, and no custom sizes |
| Output at 30 fps | No frame-rate choice; there is no frame interpolation to 60 fps |
| 6-second billing minimum | A 3-second clip costs the same as a 6-second one |
| Paid plans only | Plus, Pro and Team; not on the Free plan |
If your clip needs more than a size boost, the same Tools list has Colour grade video for colour and contrast, and you can make the whole clip in the AI Video Creator to begin with. For still images, AI image upscaling explains how the same idea works on photos. The AI video upscaler page shows another run of the tool, a paper-boat clip taken from 720p to 1080p.
Common problems and fixes
The tool isn't in the Tools list or won't run. Check the clip length (60 seconds at most) and your plan. On the Free plan, Upscale video isn't available.
The run says "Not enough sparks". The estimate is higher than your balance. Pick 1080p instead of 4K, trim the clip, or add Sparks. When this happened to our 4K attempt, nothing was charged.
Faces or text look slightly different. The model redraws fine detail, so small text and faces in tiny, blurry footage can come back subtly changed. Compare the two files before you replace the original.
The short version
Open the clip in Assets, choose Upscale video, pick 1080p or 4K, check the price and run it. In our test, a 6-second 720p vertical clip came back at 1080×1920 and 30 fps for 840 Sparks, in under a minute. Use 1080p for social video and 4K only when the destination needs it and the source is clean.
FAQ
How do I upscale a video to 1080p?
Use an AI video upscaler. In SmileToAI, open the clip in Assets, choose Upscale video under Tools, keep Target resolution at 1080p, check the estimated cost and select Confirm and run. The upscaled clip appears in Assets as a new file next to the original. In our test a 6-second 720×1280 clip came back at 1080×1920.
Can I upscale a video to 4K?
Yes. Pick 4K under Target resolution instead of 1080p. 4K costs four times as much: for our 6-second clip the run sheet estimated 3,360 Sparks, against 840 for 1080p.
How long can the video be?
Up to 60 seconds per run. For a longer video, upscale it in parts of a minute or less.
Is it free?
No. Upscale video is an AI tool on paid plans (Plus, Pro and Team), billed in Sparks per second of video with a 6-second minimum. In our test, 6 seconds at 1080p cost 840 Sparks.
Does upscaling change the frame rate?
The output is always 30 frames per second. Our 30 fps source came back at 30 fps. There is no frame-rate option, so a 24 or 60 fps clip will also come back at 30.